Temporal Anti-Aliasing (TAA) is an Anti-Aliasing (AA) method that utilizes temporal filtering methods to improve AA stability in motion.
What differentiates it from other AA methods is that TAA produces visual results that are better or equal to other AA methods whilst being less performance intensive than other AA methods.
Not only this but TAA can also be used in other areas such as smoothing shadow maps and smoother screen space ambient occlusion techniques.
A brief history
Before being used in real time graphics applications, TAA was first developed as a technique for films that utilize 3D graphics in the 1980s
In 2011, a form of TAA begins to be utilized in real time applications starting with Crysis 2. This implementation has an emphasis on motion blur
Exploded in popularity when it was discussed in a 2014 SIGGRAPH presentation given by Epic Games who developed their own take on TAA using super-sampling
Utilized in DOOM 2016 which uses a similar super-sampling method coupled with TAA
Also used in Horizon: Zero Dawn via the decima engine which couples TAA with FXAA
The developers of Inside also adapted TAA into the Unity Engine which they presented in a 2016 GDC talk which I followed very closely for this project.
Ingredients
Modern OpenGL context (preferably core profile) with double buffer rendering
Geometry buffer including:
Colour buffer
Velocity buffer
Depth buffer
History buffer. An array containing 2 geometry buffers (for storing the previous frame)
A bool/flag used for toggling which history buffer is active for a given frame
Uniform Buffers
velocity reprojection
TAA settings
Jittering settings
A textured model (preferably a highly aliased model like a tree)
The geometry translation, camera projection and view matrices.
Use the previous and current frame camera data to create 2 sets of positional data that will be used in the next shader stage
Fragment:
determine velocity using the 2 sets of positional data and store that in the velocity buffer.
If necessary, apply dithering to avoid potential depth sorting issues with textures that have transparency.
Change camera to orthogonal projection for 2D drawing
TAA pass – take the velocity with current and previous depth and color render textures which are used to determine how much to blur the current and previous scene.
Vertex: Pass through quad shader
Fragment:
Get the UV of the closest depth value within the depth buffer of the current frame in a 3×3 kernel.
Use that UV data to sample from the velocity buffer which is then set in the negative. The velocity UV is then used to sample the depth of the history buffer at that location.
Next is the resolve function which will return the final image (too long to be left here)
Final Pass
Draw final TAA texture to back buffer / (or blit current history buffer to backbuffer)
Prepare to render the next frame
Repeat steps 1-7
Preparing the next frame
Swap back buffers
Clear frame buffers
Clear back buffer
Update the uniforms]
History buffer and swap the active buffer for the next draw. (flip the history buffer bool)
This is the final phase of TAA where the depth, color or luma(light) of both the current and previous scene as well as velocity are used to determine when to and how much to blend the current scene with the previous scene.
Blending with the current scene too much will not make much of a difference especially in motion whereas leaning too much on the previous scene will cause ghosting artifacts (this is essentially pseudo recursive rendering).
My implementation simply gets the average depth of pixel in a 3×3 neighborhood and checks whether that average is higher than an arbitrary value. If the average is too low, then we can guess that there is nothing there at that pixel or its the very edge or an object, so we stop blending with the previous scene to cut down on ghosting artifacts.
TAA resolve functions
There are a number of resolve functions that we can use to boost the visual quality of TAA which currently exist but for this project I picked the Inside TAA resolve method particularly because of the visual results in addition to the fact that this resolve method is much easier to understand than others I’ve found.
For brevity here is a link to the original paper written by the developers of Inside.
Jittering
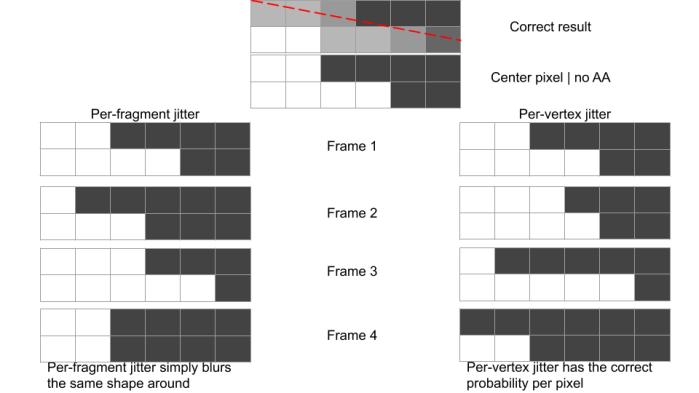
Jittering is an AA method typically used for static scenes which works by very subtly moving (or shaking) world geometry in (viewspace?), by using an array of evenly distributed noise values (Halton [2, 3] sequence). Ithe amount of movement cannot exceed that of 1 pixel or else the jittering will cross over from sub-pixel blurring (creating a nice AA effect on all effected geometry) to full on blurring. The jittered pixel is then naturally blended over multiple frames (TAA pass) to smooth jagged edges.
Jittering is done via a vertex shader (jitter.vert) by manipulating the projection matrix like below for AA in a static scene. For determining velocity, it’s important to use the unjittered current scene and previous scene so it’s a better idea to make a copy of the projection and manipulate that.
Below is an image that illustrates why jittering the vertices instead of jittering every pixel of an image is preferable.
Also be sure to not apply jittering in the fragment shader as this will result in an incorrect blur.(as well as blur the entire image instead of the geometry, ignoring depth based blur so things further away appear blurrier than they should).
Velocity
We use the previous camera View and geometry translation matrices in the jitter vertex shader so can have both the current and previous jittered positions of the geometry. This data is used in the next step of the shader pipeline in order to generate the velocity information needed by calculating the positional (in screen space) difference between the geometry in the current and previous frames.
This velocity value will then be stored in a render texture to be later used when applying the final TAA effect. When used in the TAA pass, it is needed for determining where to sample from the history depth buffer. The larger the depth value (in either positive or negative values), the further away the pervious depth is sampled as a parameter in the final blending for TAA.
Calculating velocity – vertex shader
During the geometry pass get the difference in position from the current frame and the previous frame. First create 2 extra vertex shader outputs and render the current and previous scene to these outputs by using the view and translation matrices of the current and previous scene.
//these 2 should be in screen space
outBlock.newPos = projection * view * translation * position;
outBlock.prePos = projection * previousView * previousTranslation * position;<span id="mce_SELREST_start" style="overflow:hidden;line-height:0;"></span>
Be sure to save the view and translation matrices from the previous frame to use here. Also note that when calculating velocity, you do not want to use the jittered positions which can cause the velocity to be inaccurate.
Calculating velocity – fragment shader
First move the outputs from the vertex shader from screen space (-1 to 1) to UV space (0 to 1).
Then calculate velocity as (newPos – prePos) and output that to the velocity render texture
NOTE: velocity values can be incredibly small which would require the use of a high precision texture (which can take a lot of memory). A way to get around that is to first multiply the velocity by a large number and in the next pass when reading from the velocity texture, divide the value by that number to restore the original values. This is done for those values to be saved to a lower precision texture (0.01 -> 1(lower precision))
History Buffers
These are needed for blending between the current and previous frames using a current frame flag (usually a bool) for determining the active history to draw from, draw to and clear buffers. This flag will be flipped between the 2 states every frame to swap which buffer does what every frame.
During the TAA pass, the selected history buffer will have its colour and depth used for blending the current and previous frames together. After rendering, remember to first clear the previous framebuffer the copy the current depth from the geometry buffer into the depth attachment of the current history buffer (before flipping the current frame flag).
historyFrames[!currentFrame]-&gt;Bind(); //clear the previous, the next frame current becomes previous
historyFrames[!currentFrame]-&gt;ClearTexture(historyFrames[!currentFrame]-&gt;attachments[0], clearColor1); //color
historyFrames[!currentFrame]-&gt;ClearTexture(historyFrames[!currentFrame]-&gt;attachments[1], clearColor2); //depth<span id="mce_SELREST_start" style="overflow:hidden;line-height:0;"></span>
//copy current depth to previous or vice versa?
historyFrames[currentFrame]-&gt;attachments[1]-&gt;Copy(geometryBuffer-&gt;attachments[2]);
Ghosting
Ghosting is caused by a combination of when the current and previous frames are mixed improperly, resulting in accumulated data that is carried over from one draw call frame to the next, creating a “wispy” effect when the camera or scene is moving in a rapid speed.
This occurs during the final shader pass which blends both the current and previous frames together (depending on pixel velocity), to smooth the image whilst in motion. However, there are ways to mitigate ghosting with the most basic solution by doing a neighbourhood depth test (of the current frame) in the final TAA shader.
float averageDepth = 0;<span id="mce_SELREST_start" style="overflow:hidden;line-height:0;"></span>
for(uint iter = 0; iter &lt; kNeighborsCount; iter++)
{
averageDepth += curNeighborDepths[iter];
}
averageDepth /= kNeighborsCount;
//for dithered edges, detect if the adge has been dithered?
//use a 3x3 grid to see if anyhting around it has high enough depth?
if(averageDepth <span id="mce_SELREST_start" style="overflow:hidden;line-height:0;"></span>&lt; maxDepthFalloff)
{
res = taa;
}
else
{
res = texture2D(currentColorTex, inBlock.uv);
}
Another method is neighbourhood clamping (inside a 3×3 kernel):
minN = min(3×3 neighbor kernel) maxN = max(3×3 neighbor kernel) History = clamp(history, minN, maxN)
Halton [2, 3] sequence
When Jittering, a two-dimensional array of noise is used to move the scene around in an even spread. To get this even spread, the Halton 2, 3 sequence is preferable as this sequence produces a range of random numbers evenly covers a wide range that is much smoother than other noise generating sequences.
glm::vec2 haltonSequence[128];
float CreateHaltonSequence(unsigned int index, int base)
{
float f = 1;
float r = 0;
int current = index;
do
{
f = f / base;
r = r + f * (current % base);
current = glm::floor(current / base);
} while (current &gt; 0);
return r;
}
On start-up:
for (int iter = 0; iter &lt; 128; iter++)
{
jitterUniforms.data.haltonSequence[iter] = glm::vec2(CreateHaltonSequence(iter + 1, 2), CreateHaltonSequence(iter + 1, 3));
}
Quincunx shape
A simpler alternative to using a halton[2, 3] sequence. Essentially a 5-point star shape.
Dithering can be combined with TAA blending to mitigate some transparency and depth related issues and can also be used to assist AA in a static scene by introducing a probability of a pixel being rendered in the geometry pass.
This probability is based on the alpha level of the pixel with the higher alphas being more likely to be drawn and lower alpha being less likely. E.g if the alpha is 0.5 then only half of those pixels should be drawn, if 0.25 then %25 should be drawn, etc.
Dithering is then smoothed out in the TAA pass by blending the current and previous scenes which will cut down the amount of visual noise usually associated with dithering.
Sharpening
You can also apply a sharpening after the TAA pass if your implementation leaves the image a little too “soft” looking which is a common complaint about the TAA implementation in some games.
TXAA = TAA + FXAA
This is straightforward, in addition to using jittering as the means of AA, an FXAA shader is used after the jitter/geometry pass (but before the TAA pass). This is a popular method od additional AA as FXAA excels at removing jagged edges from lines and grid shapes whereas jittering typically is not.
TSMAA = TAA + SMAA
This is combining Sub-pixel morphological Anti-Aliasing with temporal filtering to generate an amazingly clean final image.
Other uses
Temporal filtering can also be used in other areas of rendering such as smoothing shadow maps and ambient occlusion noise.
My criticisms
The process of learning how to implement TAA was very difficult considering a severe lack of step by step tutorials and documentation as well as a lot of the documentation that does exist is really difficult to understand for people who don’t have a strong background in mathematics or years of graphics programming experience.
Also, both the Inside paper and the Unreal Engine 4 paper have typos with the UE4 paper having a larger typo that can easily cause issues.
Up until recently I’ve only been able to afford a single monitor which had greatly diminished my abilities to implement and test multi-monitor features. Now that I have can properly test these features, right away I found a few bugs that were caused by both a signed/unsigned integer issue as well as an issue with the components of the monitor struct.
The use of unsigned integers was causing rollover within the monitor struct, which when full-screen is toggled, would parse in erroneous data to both the SetResolution() and ToggleFullscreen() functions.
As for the issues with the monitor struct, this was caused by trying to overload the extents variable to not only contain the extents of a monitor but also the resolution of the monitor. This has been changed to where the extents variable only contains the extents of the monitor and a new vec2_t variable has been added to contain the resolution of the monitor.
This is something that I have been meaning to do for a very long time. The last time i touched the library was over a year ago and I’ve been putting off this overhaul as up until recently I’ve been struggling to come up with a new design that could easy to use whilst also removing the need for coding patterns like Singletons*.
After I overhauled TinyWindow I wanted TinyShaders to have the same treatment but there was a lot that had to be changed and redesigned starting with how someone would be able to have access to shaders and shader programs. I wanted to get rid of the GetShaderByName() and GetShaderByIndex() functions and instead replace it with something more streamlined for starters.
So taking a page from TinyWindow I changed up the library quite significantly:
The shader_t and shaderProgram_t structs are now public
Changed the manager class to contain maps(with the name of the object being the key) of unique pointers for both shader_t and shaderProgram_t
changed error handling to use modern C++ error handling techniques
loading functions now take a reference as a parameter as a means of outputting
most functions now return a std::error code
removed functions that are now useless
added a lot more error checking
*As a personal rule I’ve come to frown upon the use of singletons and I believe that if you have to use more than one in your code base something has gone horribly wrong.
So I just spent two hours livestreaming a coding/jam session on Twitch.tv (https://www.twitch.tv/ziacko). In that time I have managed to finally find the bug that I have been having on Linux for a while now however fixing that bug will take a little longer. now this problem is related to creating modern OpenGL contexts and as far as I have been finally able to figure out the crashing issue I have been having is caused by having an invalid attribute list for creating modern contexts.
However when I began working on this update I learned that to create modern OpenGL contexts on Linux the process for doing so is faaaaaaaaar more straightforward than the method needed for Windows. It is simply a case of loading the extension glXCreateContextAttribsARB right after a X11 window has been successfully created. My reaction to learning about his from the OpenGL superbible looked like this:
As a reminder, the method for creating a modern OpenGL context in Windows roughly involves:
creating a non-rendered window
using that window to create a base OpenGL context
using that base context to load WGL extensions needed to create a modern context
deleting the old window and context to keep tidy (steps 1 – 4 are before done on program launch)
creating a regular window when a request to create a window is received by TinyWindow
using the loaded extensions to create a modern OpenGL context
Once i have fixed this bug I will endeavor to make sure the Windows and Linux versions match up feature-wise
Added a small but useful feature to TinyWindow which should help in the future development of tools and apps that could take advantage of drag and drop functionality such as a program that can load in a texture in run-time just by dragging in the file(s) or perhaps creating a new window for each file that is dragged in.
Made an improvement to the legacy window creation system for the creation of dummy and fallback contexts. This update drops the use of ChoosePixelFormat for picking PFDs for a customized system that weeds out PFDs that are incompatible with OpenGL and then determines the closest PFD to the desired PFD.
The reason why I decided to drop ChoosePixelFormat is that according to the official documentation the function will take a given PFD and use that to sift through every PFD to find the most compatible PFD. The problem with that is the fact that the function may not always pick the very best PFD for the task which can become a significant problem.
const correctness to the example to improve performance
fixed a few potential bugs
if WGL extensions fail to load TinyWindow will revert to using the old school method
added more error messages
enhanced GetSwapInterval and SetSwapInterval
added more WGL extensions for a future update to add the ability to enumerate through available pixel formats
to fix this issue I had to change the pixel format attributes I used when creating new windows using advanced contexts. After a few hours I finally found that I had forgotten to add WGL_DOUBLE_BUFFER_ARB to the attribute list thus making swap control useless since there was only one draw buffer available.
//creating a dummy context to load extensions using Win32
int attribs[] =
 {
 WGL_SUPPORT_OPENGL_ARB, 1,
 WGL_DRAW_TO_WINDOW_ARB, 1,
//add this when creating advanced window contexts to enable swap control
 WGL_DOUBLE_BUFFER_ARB, 1,
 WGL_RED_BITS_ARB, 8,
 WGL_GREEN_BITS_ARB,8,
 WGL_BLUE_BITS_ARB, 8,
 WGL_DEPTH_BITS_ARB, 24,
 WGL_STENCIL_BITS_ARB, 8,
 WGL_ACCELERATION_ARB, WGL_FULL_ACCELERATION_ARB,
 WGL_PIXEL_TYPE_ARB, WGL_TYPE_RGBA_ARB,
 0
 };
With the release of Vulkan, I have been looking and looking for useful tutorials on the subject. I am not going to go into the specifics of the API, why it’s amazing and has incredible potential. Instead in this post I will tell you how I followed a strong tutorial on the subject, and adapted TinyWindow to support Vulkan as well as the challenges I faced.
The first hurdle I had working with Vulkan was finding a decent tutorial. Sure there are plenty that showed me how to create an instance of Vulkan and get retrieve the necessary metadata and there are of course pre-built open source frameworks such as this one written by Sascha Willems but I wanted a step by step guide and luckily I found just that on a thread in the Vulkan subreddit forum. The tutorial itself can be found here.
One of the first hurdles I had found was that to create a drawing “surface” on Windows I need to give the API platform dependant information from TinyWindow. This caused a small design problem as I had designed TinyWindow to keep information that is platform dependant private and so to work around that I added a few functions to TinyWindow that would allow me to only GET the necessary information for Vulkan.
The next and also the largest issue that TinyWindow had with Vulkan is that OpenGL and Vulkan rendering instances cannot share the same window. I discovered this when after following the first part of the tutorial to the letter, my version kept inexplicably crashing when I tried to create a Vulkan rendering context. After some time and frustration I noticed that in the tutorial when creating the window, the tutorial does not initially create a rendering instance, instead the instance is created at a later point in the code. To fix this issue I simply commented out an internal function call within TinyWindow that would ordinarily create a OpenGL rendering context which would then conflict with Vulkan causing my program to crash.
Once that was fixed and I completed the tutorial I went back and made some minor (and temporary) fixes to TinyWindow that would Allow TinyWindow to support Vulkan without needing the code to edited. To allow TinyWindow to switch between Vulkan and OpenGL I implemented a simple hack that involves anyone using TinyWindow to first define the C style macro “TW_USE_VULKAN” before the TinyWindow header into their code. If the Macro has been defined, TinyWindow will simply not create a OpenGL instance in that window which prevents any conflicts with Vulkan.
In the future I want to implement a more elegant system that will allow for the simultaneous creation of different types of rendering contexts whether they be OpenGL, Vulkan or even possibly DirectX. To implement this I am considering developing a class enumeration based system wherein a TinyWindow window would contain a constant member enum that states what type of rendering context the window will be using.
There are of course issues with this as DirectX is only (natively) supported on Windows as well as a myriad of other issues including functions that are made for swapping drawbuffer functions and also playing with multiple contexts with functions such as (wgl/glx)MakeCurrent being different depending on rendering context as well as platform.
Hopefully with some skill and a lot of patience I may actually be able to develop a truly unique window API.
This velocity value will then be stored in a render texture to be later used when applying the final TAA effect. When used in the TAA pass, it is needed for determining where to sample from the history depth buffer. The larger the depth value (in either positive or negative values), the further away the pervious depth is sampled as a parameter in the final blending for TAA.